- Published on
WebGPU Learning Note 2 - Rotating Cube
- Authors

- Name
- Sean Wang
- @firemousefish
Click RotatingCube Demo to check the demo in this article
1. Vertex Buffer and Index Buffer
What is vertex buffer and index buffer?
The Buffer here is a sequential memory space that can be used by GPU. Vertex and Index is the key data to draw a object. For Example:
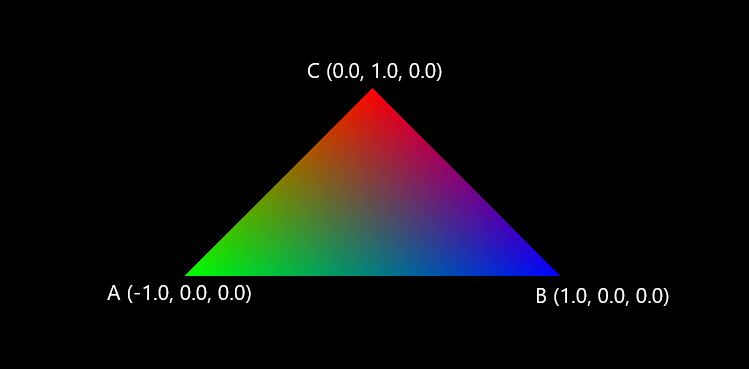
If we want to draw the above triangle, we need to know the vertex A,B,C position. This is the simplest vertex data. And the Vertex Buffer is the place to hold this data in GPU memory. Index data is the order to draw the vertex A, B, C, such as if we drawing order is count-clock wise, the order is A->B->C, and the index of each vertex information in vertex buffer will be 0,1,2.
How to create vertex and index buffer?
First step we will use THREE.js feature to create a BoxGeometry, and we can get vertex and index information from THREE
const cube = new THREE.BoxGeometry(2, 2, 2)
Then based on the cube data from three.js, we can esaily get it's vertex(position) and index to create vertex and index buffer.
const vertexByteLength = cube.attributes.position.count * 3 * Float32Array.BYTES_PER_ELEMENT
const vertexBuffer = ds.gpuDevice.createBuffer({
  size: vertexByteLength,
  usage: GPUBufferUsage.VERTEX,
  mappedAtCreation: true,
})
new Float32Array(vertexBuffer.getMappedRange()).set(cube.attributes.position.array)
vertexBuffer.unmap()

const indiceByteLength = cube.index.count * Uint16Array.BYTES_PER_ELEMENT
const indiceBuffer = ds.gpuDevice.createBuffer({
  size: indiceByteLength,
  usage: GPUBufferUsage.INDEX,
  mappedAtCreation: true,
})
new Uint16Array(indiceBuffer.getMappedRange()).set(cube.index.array)
indiceBuffer.unmap()
- Vertex and index Buffer creation is very similar, the only difference is usage here to declear what is this buffer used for.
- size is the byte size of the buffer, so like above triangle, vertex A has 3 point, and we have 3 vertex, it should be 3 x 3 x byte sizeof Float32Array element
- mappedAtCreation means if we want this buffer to be mapped, since we can not directly transfer data from CPU memory to GPU memory, before we transfer the data, need to map the buffer first.
- and the last step before unmap the memory, is the real data transfer happens.
Next we will config this buffer data in pipline to let shader know the struct of the vertex buffer we set. so in createRenderPipeline we add buffer config in vertex
...
vertex: {
    module: this.gpuDevice.createShaderModule({
        code: vertexShader,
    }),
    entryPoint: 'main',
    buffers: {
        arrayStride: 3 * Float32Array.BYTES_PER_ELEMENT,
        attributes: [
            {
                shaderLocation: 0,
                offset: 0,
                format: 'float32x3',
            }
        ]
    },
},
...
- arrayStride is the byte size for each single vertex data, here because each vertex we only have 3 position point, so it's 3 _ byte size of float number. In genera case, the vertex can also contain texture information u, v or normal information, so if it has 3 normal value follow by position point, the arrayStride will be ( 3 + 3 ) x byte size of float number
- offset is the position of the vertex in the array, so same if we have normal again, the normal offset will be 3 * byte size of float number which is the position space in front of it
Last in render loop, we will bind the vertex buffer and index buffer to render
passEncoder.setVertexBuffer(0, vertexBuffer)
passEncoder.setIndexBuffer(indiceBuffer, 'uint16')
passEncoder.drawIndexed(cube.index.count, 1, 0, 0, 0)
- The full setVertexBuffer function is
setVertexBuffer(GPUIndex32 slot, GPUBuffer buffer, optional GPUSize64 offset = 0, optional GPUSize64 size);slot is the vertex slot align with the shader, buffer is the vertexBuffer we created above, offset is the offset position in the vertex buffer, and size is the byte size of the this mesh we will draw. - The full setIndexBuffer function is
setIndexBuffer(GPUBuffer buffer, GPUIndexFormat indexFormat, optional GPUSize64 offset = 0, optional GPUSize64 size);buffer is the IndexBuffer we created above, indexFormat is the type of the element in index buffer, normally it's 'uint16', we also can use 'uint32' for complex object. size and offset is similar meaning as decribed in vertex buffer. drawIndexed(indexCount, instanceCount, firstIndex, baseVertex, firstInstance), similar to draw, but we give indexCount instead, and we can give a baseVertex to offset the index number.
2. Uniform
What is Uniform?
A uniform is a blob of data that is available to every invocation of a set of shaders. We use uniform to set the model view projection matrix and color in this example.
What is MVP Matrix?
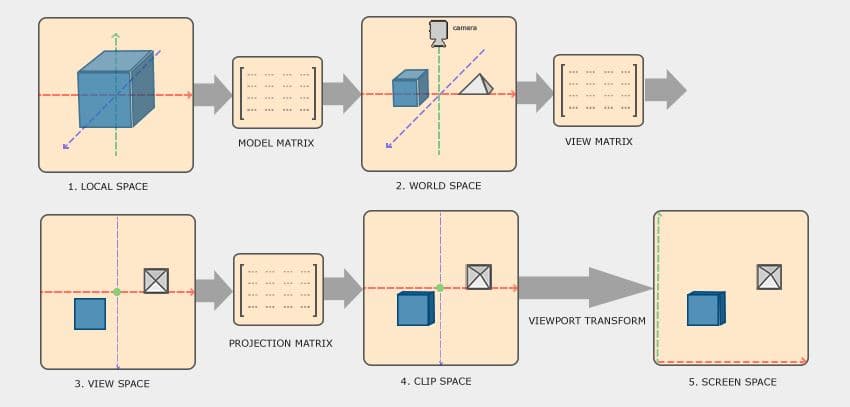
So the step to render a geometry to screen is:
- We use model matrix to move the geometry from a (0, 0, 0) local orgin to its world position and size, for example, we have a chair created at (0, 0, 0), but it should move to the northwest coner facing south in the room, and the size of chair is smaller than the original regular chair. so the model matrix moves the chair from origin to that northwest position, rotate the chair to face south and scale it to the smaller size.
- Then view matrix moves the geometry to a relative position of the camera origin, it's like when you in a room and look around, what is the desk and chair relative to your position. so it is easier to calucate the camera based position of the geometry.
- Projection matrix is used to project the geometry from a 3D space to a 2D screen position.
How do we setup the Uniform?
Same as above, we will first use THREE.js to create a camera to easily get the projection and view matrix we need. We are not talking about how to create projection and viewmatrix here.
const aspect = canvasRef.current.width / canvasRef.current.height
const camera = new THREE.PerspectiveCamera(72, aspect, 1, 100.0)
camera.position.z = 4
camera.lookAt(0, 0, 0)
camera.updateMatrixWorld()
We will use two uniforms in this exmaple, the first uniform will store the view * projection matrix, which will be static value in this example, cause we don't move the camera at all. Second uniform will store the model matrix and the color that we will change on each frame.
const _projectViewMatrix = camera.projectionMatrix.clone().multiply(camera.matrixWorldInverse)

const uniformBufferSize = Float32Array.BYTES_PER_ELEMENT * 16
const uniformBuffer = ds.gpuDevice.createBuffer({
  size: uniformBufferSize,
  usage: GPUBufferUsage.UNIFORM,
  mappedAtCreation: true,
})
new Float32Array(uniformBuffer.getMappedRange()).set(_projectViewMatrix.toArray())
uniformBuffer.unmap()

const uniformModelBufferSize =
  Float32Array.BYTES_PER_ELEMENT * 16 + Float32Array.BYTES_PER_ELEMENT * 4
const uniformModelBuffer = ds.gpuDevice.createBuffer({
  size: uniformModelBufferSize,
  usage: GPUBufferUsage.UNIFORM | GPUBufferUsage.COPY_DST,
})
- Very similar to the buffer creation we used to create vertex buffer and index buffer, we just need to define usage to GPUBufferUsage.UNIFORM type
- Since the second buffer we will keep updating on each frame, so we don't need to map to set the data here, instead we will define GPUBufferUsage.COPY_DST to make sure we can update the buffer data
- We update the buffer data by using following in the render loop stage:
ds.gpuDevice.queue.writeBuffer(
  uniformModelBuffer,
  0,
  uniformArray.buffer,
  uniformArray.byteOffset,
  uniformArray.byteLength
)
uniformArray is the array of model matrix and color that we rotate the cube and change the color in each frame, and we push the writeBuffer command in to the queue for GPU to pick up the job to excute. This method is slower than just map the buffer and transfer the data.
Next step is setting the uniform to pipline so shader is understanding the uniform data
const uniformBindGroupLayout = ds.gpuDevice.createBindGroupLayout({
  entries: [
    {
      binding: 0,
      visibility: GPUShaderStage.VERTEX,
      buffer: {
        type: 'uniform',
        hasDynamicOffset: false,
      },
    },
  ],
})

const pipelineLayout = ds.gpuDevice.createPipelineLayout({
  bindGroupLayouts: [uniformBindGroupLayout, uniformBindGroupLayout],
})
and in createRenderPipeline we change layout to apply the above layout
...
 layout: pipelineLayout, // before it's 'auto'
 ...
Since the pipeline is mainly tell the shader how to use the data, so let's take a look at the new WGSL vertex shader first to understand the above pipelineLayout.
struct Uniforms {
   viewProjectionMatrix: mat4x4<f32>,
}

struct ModelUniforms {
   modelMatrix: mat4x4<f32>,
   color: vec4<f32>,
}

@binding(0) @group(0) var<uniform> uniforms: Uniforms;
@binding(0) @group(1) var<uniform> modelUniforms: ModelUniforms;
We have viewprojection uniform struct and modeluniform struct been decleared in the shader, and the binding(0) is the binding settings in bindGroupLayout above, since we have two groups for two different uniform, so the array [uniformBindGroupLayout, uniformBindGroupLayout] index need to excatly match the group(0) and group(1) in the shader.
@vertex
fn main(@location(0) position: vec3<f32>) -> VertexOutput {
    var output: VertexOutput;
    output.Position = uniforms.viewProjectionMatrix * modelUniforms.modelMatrix * vec4(position.xyz,1.0);
    output.color = modelUniforms.color;
    return output;
}
Then we just use the uniform in the main function.
The last thing we will do is to create the binding groups that links bindGroupLayout and buffer which can be used in render loop.
const uniformBindGroup = ds.gpuDevice.createBindGroup({
  layout: renderPipeline.getBindGroupLayout(0),
  entries: [
    {
      binding: 0,
      resource: {
        buffer: uniformBuffer,
      },
    },
  ],
})

const uniformModelBindGroup = ds.gpuDevice.createBindGroup({
  layout: renderPipeline.getBindGroupLayout(1),
  entries: [
    {
      binding: 0,
      resource: {
        buffer: uniformModelBuffer,
      },
    },
  ],
})
- layout value needs to match the pipeline layout index and shader group id, so the viewprojection unifrom is index 0 in pipelineLayout
[uniformBindGroupLayout, uniformBindGroupLayout], and the modeluniform is 1. - binding needs to match the binding we defined in the shader and bindGroupLayout
- buffer is just give the uniform bufer we created in the beginning.
We can setBindGroup we created above in render loop like below:
passEncoder.setBindGroup(0, uniformBindGroup)
passEncoder.setBindGroup(1, uniformModelBindGroup)
- The first parameter (0 , 1) is the binding group we set in both shader and bindinggroup layout
- the second is just the bindinggroup we created above.
3. Depth Buffer
What is Depth Buffer and Why we need it?
When we draw this cube, if the back face has different color with front face, we need draw back face first then draw front face to make the color correct. Because when we project 3D to 2D screen position, back face will be in the same pixel as front face, if we draw front face first then draw back face color, the back face color will overwrite the front face in the same pixel point.
Depth Buffer is a texture that stores the z-coordinate of rendered pixels, so each pixel now have a depth value in range [0.0, 1.0] that we know which one is more close to camera and we need to use the closer pixel and drop the further one.
How do we setup the Depth Buffer?
const depthTexture = ds.gpuDevice.createTexture({
  size: ds.presentationSize,
  format: 'depth24plus',
  usage: GPUTextureUsage.RENDER_ATTACHMENT,
})
- Since depth buffer is a black white texture, so we need create a texture first by using createTexture function.
- size is the canvas size align with our drawing size, format need to set to depth format, and we use depth buffer here as a RENDER_ATTACHMENT same as our drawing texture.
 const renderPassDescriptor: GPURenderPassDescriptor = {
       ...
        depthStencilAttachment: {
            view: depthTexture.createView(),
            depthClearValue: 1.0,
            depthLoadOp: 'clear',
            depthStoreOp: 'store',
        }
      ...
    };
In renderPassDescriptor we assign the depth texture to depthStencilAttachment, and set the depthClearValue depthLoadOp depthStoreOp similar as the colorAttachments. Since depth buffer value is project to the range of between [0, 1], so we set the depthClearValue to 1.0 which is the largest value of the depthbuffer.
4. In The End
Now we can basically render a cube on the screen with above code changes to hello triangle example, I didn't include the change rotation model matrix and change color code here, you can try use a static color and identity matrix instead to simplify.